FAQ: How do I set up NextGen® Laboratory (NGL) reports to run automatically without manual intervention?
Answer: Create a Report Schedule so your reports will be waiting in your inbox, on your set schedule, instead of having to manually create the report each time. Follow the outline of steps below to set up the reports that are normally run. These reports can then be automatically subscribed to or emailed to other NextGen Healthcare users.
Creating a Report Schedule
To create a new schedule for a report, perform the following steps:
-In the Main Menu, click Management Reports.
-Select the report that you want to customize. Depending on the report you chose, one of the following is displayed:
- Turnaround Time window (See Image 1)
- Exception Reports window
- Productivity Reports window
- Results Reports window
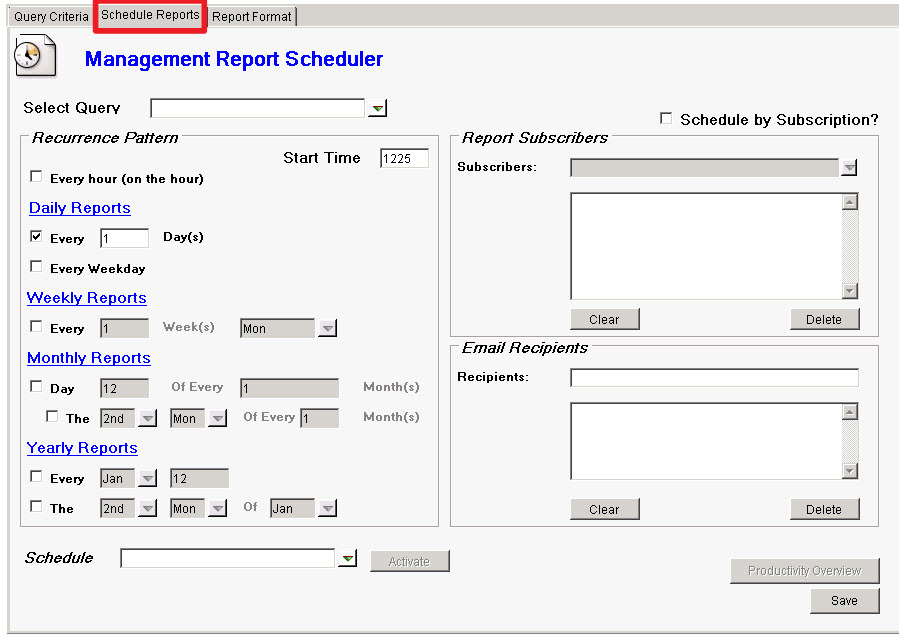
-In the report window, select the Schedule Reports tab. (See Image 2) A list of scheduling options is displayed
-In the Select Query box, if you have one or more saved queries, you can select the query from the list for which you want to create a report schedule.
-In the Start Time box, you can specify the time you want the scheduled report to run. You can specify the time either using military time or using the format “hh:mmx” where x represents either “a” (for AM) or “p” (for PM).
- For example, to specify 9:49 am, you could type either “9:49a” or “0949”.
Set a Recurrence Pattern using only one of the following scheduling patterns. If you need a report to print on more than one schedule, you must create multiple schedules for the report.
- Daily Reports (Two options available)
- Specify the number of days to pass between reports (a number between one and 365). For example, specify“3,” to print the report every third day.
- Select the Every Weekday check box to have the report print every day, Monday through Friday, but not Saturday or Sunday.
- Weekly
- Specify the number of weeks to pass between reports (a number between one and 52) and then choose a day of the week on which to print the report. For example, specify“2” weeks and then choose “Wed” (Wednesday) to print the report biweekly on every second Wednesday.
- Monthly (Two options available)
- Specify the day of the month and then specify the number of months to pass between reports. For example, specify “15” days and “3” months to print the quarterly report every third month on the 15th day of the month.
- Choose the positioning in the month from the list, choose the day of the week from the list, and then specify the number of months to pass between reports. For example, choose the “3rd” “Fri” and “4” months to print the report every four months on the third Friday of the month.
- Yearly (Two options available)
- Choose a month from the list and then specify the day of the month on which to print the report. The report will print once a year on the day and month you specified. For example, choose “Dec” and specify “31” to print an annual report on the last day of the year.
- Choose the position in the month from the list, choose which day of the week from the list, and then choose which month from the list. For example, choose the “last” occurrence in the month, choose “Fri,” and specify “Dec” to print the annual report on the last Friday in December.
-You can distribute completed reports in one of the following ways:
- By Subscription:
- Use the Subscribers box in the Report Subscribers area to create a list of NextGen Lab users who should receive a copy of the report in their Report Subscription window. Select the Schedule by Subscription check box to activate the Subscribers function and to disable the Recipients function. After typing a NextGen Lab user name into the input box, press ENTER or TAB to move the user name into the larger box below the input box. Repeat this action to add additional user names to the list of subscribers.
- By Email:
- Use the Recipients box in the Email Recipients area to create a list of people who should receive a copy of the report as an email message. Clear the Schedule by Subscription check box to activate the Recipients function and to disable the Subscribers function. After typing an email address into the input box, press ENTER or TAB to list the email address in the larger box below the input box. Repeat this action to add additional email addresses to the list of recipients.
- If you make a mistake and need to remove an e-mail address, simply select the email address and then click Delete. To clear all the email addresses out of the list box to start over again, click Clear.
-In the Schedule box, you can specify a unique name for the new schedule. If you are creating several schedules for the report, you must specify a unique name for each schedule.
-Click Save. A message displays noting the report has been scheduled. Choose OK to close the message.
-Choose Query Criteria tab, and Quit to close the window, and return to the NextGen Laboratory main window.


